
Installation Guidance
Trellis panels are incredibly popular among gardeners for a number of reasons:
- You want to give your garden a makeover
- You have recently moved into a new property
- You have more time to spend at home with your garden
- You are considering using your garden to hosts guests or entertain
They are a great way of brightening up and adding some colour to a dull area of your garden. They are also good at providing screening. Trellis panels can be placed directly against a wall or can stand alone to create a feature in your garden. If you have limited space in your garden they are a great way of training climbing plants to create a vertical garden. Flowering plants encourage wildlife, particularly bees, so you can be doing your bit to help save the environment.
First of all, decide where you are going to position your trellis panel. The installation procedure is slightly different depending on whether you are planning them against a supporting wall or as a standalone feature in your garden.
Step 1. If you need to install posts into the ground you will have to dig holes and use concrete for additional support. We would recommend using a pre blended quick-setting concrete. Depending on the size of your trellis panel you will need to dig at least two or three holes. Generally, fence and trellis panels are situated in between the posts, whereas the slatted panels sit to the face (front) of the posts.
Step 2. Ensure that the posts are installed straight.
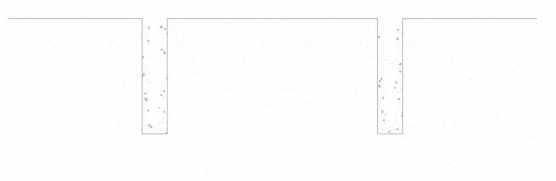
Mark out and dig holes for the post. The best way of ensuring that they have been installed straight is to set up a string line along the proposed line of the fence. Posts need to be set at least 2ft (600mm) into the ground. Use a string line to provide a guide for the position of the posts. s. For a 70mm x 70mm post we would recommend a hole that is 200mm circumference by 600mm depth.
 Step 3. Insert the post into the ground.
Once the hole is dug, carefully insert the post into the ground using a spirit level to be certain that the front of the post is carefully aligned along the string line.
 Step 4. Be careful to back fill the hole with post-mix, ensuring that you follow the instructions provided.
Adjust the post into position and support adequately for approximately 10-15 minutes or so until the post mix has set firmly.
Step 5. Measure and verify that the posts are at a uniform height.
Unless the panels are staggered to accommodate different ground levels – i.e. unless you’re on a slope, it is crucial at this stage to check and be certain that the tops of each post are at the same height. A suitable piece of straight timber can be placed along the top of the posts with a spirit level positioned on the centre of this wood allowing the levels to be checked. Check height of fence posts is level .

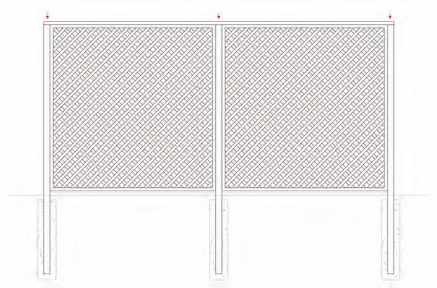
Step 6. Screw the trellis panels into the posts using 4.5mm x 50mm stainless steel screws (minimum of two per slide). Screw through the trellis frame into the side of the post. Again, please ensure that the top of each panel is level.
 How to install a trellis up against a wall.
Trellis panels have a number of uses – they can brighten up walls in your garden spaces or bring to life some dull or otherwise uninspiring areas. The shape of the panels makes them ideally suited to train climbing plants such as roses, jasmine and ivy, bringing colour and fragrance to your garden. They are also a great solution if you have limited space available and want to try ‘vertical’ gardening. Remember not to install it completely flush against the wall, as this will not give the plants any room for twining around the trellis. Please ensure that there is a small gap of between 5-10mm. Please refer to our simple installation guide below:
Step 1.
Calculate how many battens you require. If your trellis is less than 90cm wide you’ll just need two battens – one between the wall and each of the outer verticals of the trellis frame. For trellis bigger than 90cm wide, also install a central batten that will run down the middle of your trellis for additional stability.
Step 2.
Cut the battens to the correct length. The length needs to be the same as the height of your trellis.
Step 3.
You will need to fix the battens to the wall using screws and wall plugs. If you’re using batten corners instead of full length battens, position them very slightly inside the four-corner marks made for your trellis so that they’ll be concealed from view by the trellis frame once installed. Remember to ensure that the bottom isn’t directly touching the ground in order to prevent rot. If your wooden trellis is in direct contact with the ground there is a high risk that it could go rotten and distend.
Step 4.
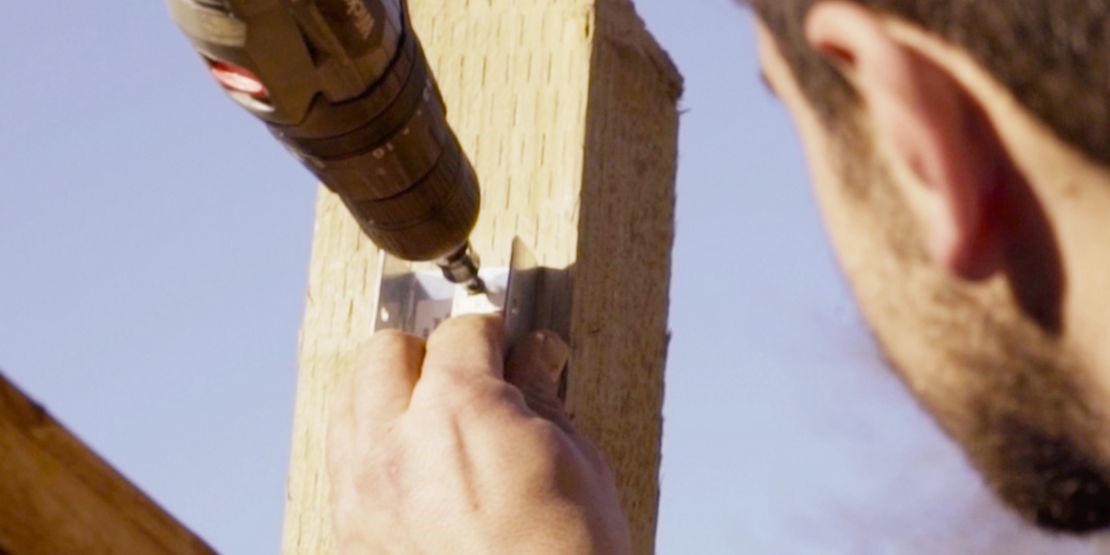
To do this, start by drilling a clearance hole through both ends of each of your battens to allow the screws to be installed more easily later on. Remember that the pilot hole needs to be smaller than the screw diameter you will use, otherwise the screws will not hold.
 Step 5.
Change the setting on your drill to a hammer action setting and use a small masonry drill bit. Put one of your battens into position as a guide for where to drill, then drill through the hole in your batten to make a mark into the stonework. Once you’ve made a mark into the stonework you can remove the batten and drill into the wall. NB – It is absolutely essential that you wear safety goggles when drilling into any type of stoneware.
Step 6.
Once the pilot hole has been drilled, use a larger drill bit to create the right size hole for the right size plug. Repeat the process, drilling holes into the wall to secure the top and bottom of each batten, or for each of the batten corners if you’re doing it that way.
Step 7.
Knock wall plugs into each of the holes and secure battens to your wall with screws. Securing the top of each batten to the wall first will ensure that the process is simpler and will make it easier for you to control the installation.
 Step 8.
Once the battens are in place, drill clearance holes through each of the four corners of your trellis to make it easier for you to insert them into the wall.
Step 9.
Screw the trellis into the battens. The easiest way to do this is to install the top row of screws first, and it will help you considerably if you get someone to hold the trellis in place whilst installing the first screw into position. If you’re working alone, it may help to prop the trellis up into the required position using a bag of compost or heavy pot.
Trellis Panels with Planters – Installation Advice.
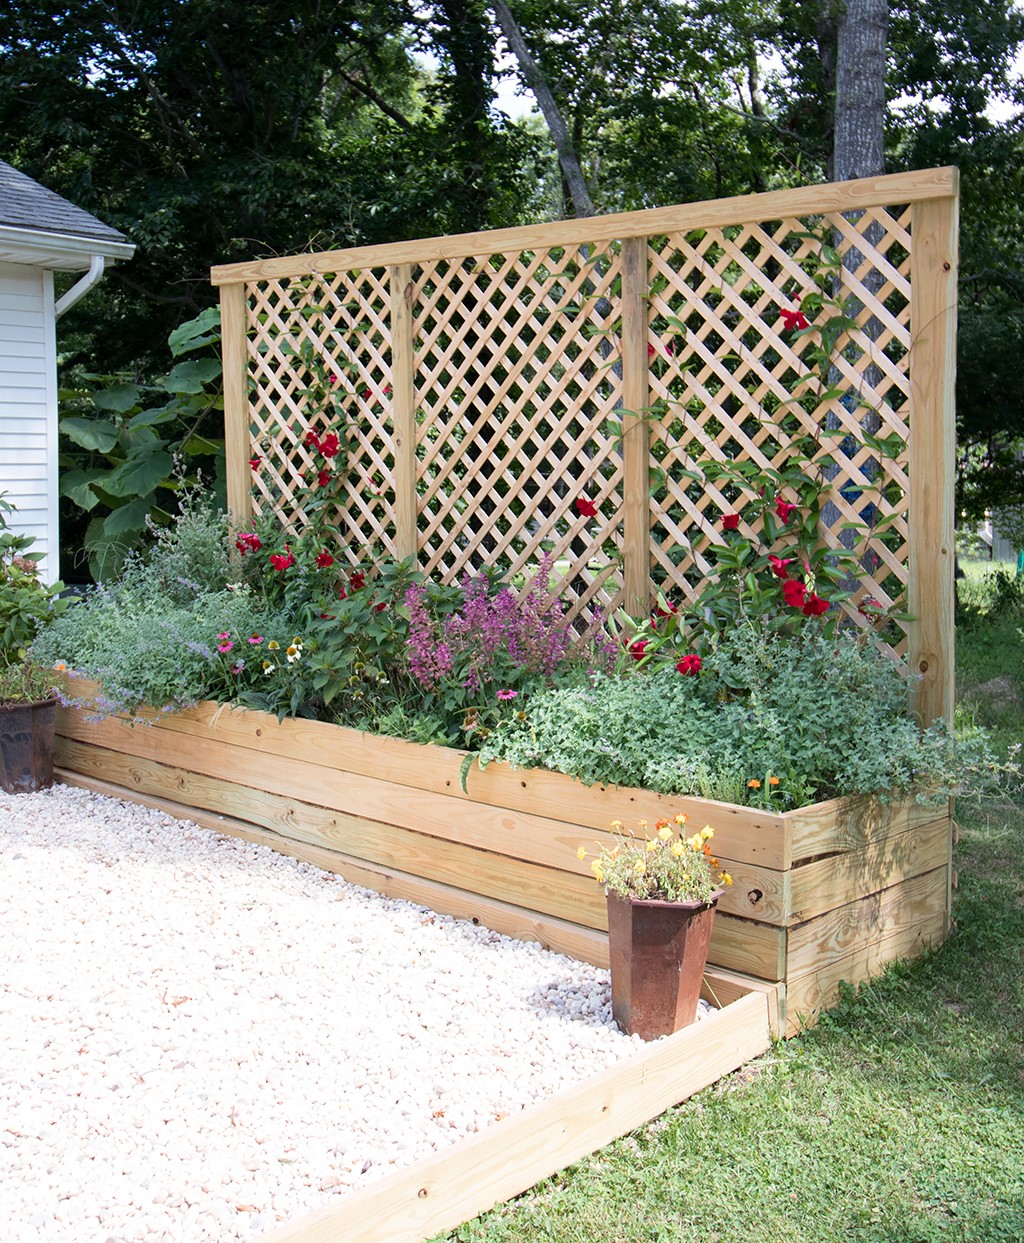 Planters are a great way of creating a bed in which to grow your plants and to grow your own vegetables. They are a great way of adding some additional colour which will help to brighten up otherwise dull or uninspiring spots in your garden.
Plants in containers do require a little more care and attention than plants planted in your garden, but by following our simple advice you can do this easily. If you are planning to put a planter in your garden you will first need to decide where to situate it in and also to prepare the ground. Planters are the perfect solution for training climbing plants or for softening hard landscaped areas such as patios or terraces.
We recommend using trellis panels with planters if you want to create a boundary in your garden, or make use of an unused wall space. Another advantage is that they will help you in showcasing your favourite plants and train climbers such as jasmine, roses or wisteria.
Depending on the size of your planter it will need to be filled with a mixture of soil and grit. Drainage is important if your plants are to thrive so we recommend that you create a customized soil mixture using sand and compost to mix in the soil. We recommend placing a layer of gravel at the bottom of the planter. The gravel holds water and increases humidity, while protecting the plants roots from any standing water.
Maintenance Guidance
Wooden planters – we recommend that prior to planting you wash the containers down with a mixture of mild detergent and water. If there are any rough edges we recommend lightly sanding with sandpaper and treat with a non-toxic wood oil. This will coat the outside surface of the wood and the primary function is to repel moisture. Additional protection will be provided if once the wood is prepared you can choose to add a coat of varnish or paint. We recommend to avoid
Plants
We recommend planting in early spring so that plants quickly grow roots and become established. Autumn planting can cause losses from waterlogging and evergreens may deteriorate during harsher winter months due to dryness at the roots or wind-burn of the foliage.
Watering
Watering is one of the most important jobs when growing plants in containers. Roots need a balance of air and water to grow well which is easy to provide if you have a good quality compost or soil. Plants don’t grow well if their roots are in very wet compost (not enough air) and plants will often benefit if the compost is allowed to dry a little between each watering. How much you need to water is very weather dependant in accordance with the season.